Thursday, February 23, 2012

Homemade Granola

  
     I love making this granola.  I used to make it all the time back in Colorado, but haven't made it since we moved to the new house.  I originally got the recipe from my friend in Germany (another military wife) but switched it up a bit and made it my own.

     When I make a batch, I double the recipe.  Double the recipe will give you the same amount that is pictured above... it's a decent amount!  :)

Homemade Granola
Dry Ingredients
3 cu. quick-cooking oats
1/2 cu. each of assorted nuts (for mine, I like mine super nutty, so I add 1/2 cu. each of chopped roasted peanuts [no salt], sliced almonds, and chopped pecans [you can get them pre-chopped but I had to smash mine myself... I bought the wrong bag].)
1/4 cu. wheat germ

Wet Ingredients
1/3 cu. honey
1/3 cu. brown sugar
1/4 cu. vegetable oil
2 Tbsp. warm water (helps it to mix easier)
1 tsp. vanilla extract

Other Ingredients
1/4-1/2 cu. each of whatever fruit.  (I add 1/4 cu. each of dried blueberries, dried cherries, and dried cranberries to my granola.  I like it tart.  However, raisins work great and so do other dried fruits.)
Non-stick cooking spray for the baking sheets


Ingredients- minus the wheat germ that I forgot to put in the photo.

Step 1- Preheat oven to 250 degrees.  Spray large baking sheet with non-sick cooking spray.

Step 2- In large bowl, combine dry ingredients. 

Step 3- Combine wet ingredients.  Mix well.

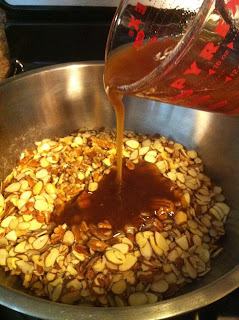
Step 4- Pour wet ingredients into your bowl of dry ingredients.


Step 5- Time to get your hands dirty!  Mix ingredients by hand until everything is coated evenly with the honey mixture.  Spread out evenly on your baking sheet.


Step 6- Bake for about 1 hour at 250 degrees, stirring every 10-15 minutes.  Depending on your individual oven, cook time may vary.  The granola is done when it is a nice golden brown, moves easily on the cookie sheet, and feels mostly dry.

Step 7- Allow to cool.  You can let it cool on the baking sheet if you'd like, but I like to cool it on sheets of wax paper on my counter.  This way, it's easier for me to get it into the container in the next step. 

Step 8- Once completely cooled, you can sprinkle your dried fruit on top. For mine, I used 1/4 cup each of dried blueberries, cherries, and cranberries.  Then, transfer your granola to your container (I pick up the edges of the wax paper and "funnel" it in), and shake the container to mix it all up evenly.

Finally, all that's left to do is to enjoy it!  Top your yogurt with it, eat it like cereal, whatever you like. 

Wednesday, February 15, 2012

Easiest Chicken Marsala EVER

     Yesterday, I'm on the phone with my mom.  I'm talking about how I'd like to make a Valentine's Day dinner, but I can't come up with any ideas that are easy and wouldn't take hours and hours in the kitchen.  Mom's solution?  Try her made-up recipe for chicken marsala.

     Now I am a sucker for chicken marsala.  I lament that there is not a Macaroni Grill within a 100-mile radius of our house... and other chicken marsalas at other restaurants have let me down.  (Now, don't get me wrong, Macaroni Grill is not the BEST ever, but it is edible... and edible is where I draw the line.)  I'm a bit of a food snob on this issue.

    Mom swore that I'd love the recipe and that it would be quick and simple.  Quick and simple, yet taste good?  I had doubts, but her stuff has always worked out before, so I made my list and headed out to the store.  I have to admit, after I made it, I had to tip my hat to Mom.  Yum!

    Behold!  Chicken Marsala with Garlic Broccoli Pasta side and Candied Pecan Cranberry Salad with Parmesan Flakes.    All done in under an hour (cook time).
I'll break the meal down into three separate recipes so you can make one or all of the dishes as you choose.

--------------Chicken Marsala--------------
6 thin-cut boneless-skinless chicken breasts.  (I purchased mine pre-cut for simplicity's sake.  You can also cut regular chicken breasts in half and pound flat.)
2 8-oz. packages of pre-sliced baby portobello mushrooms
1 cu. Italian-style bread crumbs
Parmesan cheese wedge (I purchased a wedge about the length of my hand and used it for the marsala and the salad, I still have half a wedge left.)  You need enough to make 1 cup of grated Parmesan.
2 eggs
Non-stick cooking spray
1 packet of brown gravy powder
1 cu. Marsala wine  (or Madeira wine works as well)
Olive oil
Garlic paste (You can find it in the refrigerated section of your grocery's produce section.  Comes in a toothpaste-like tube.)

Step 1- About 45 minutes before I planned to start cooking, I left the chicken breasts on the counter to get closer to room-temperature.  I didn't count this as part of the prep time, but I did set a timer so I wouldn't forget when to get started. 

Step 2- Preheat the oven to 350 degrees and spray a baking sheet with non-stick cooking spray.  Grate your parmesan (1 cup) and place into a bowl with equal amount of bread crumbs (1 cup).  Mix together.  In a separate bowl whisk two eggs and set aside.

Step 3- Open your chicken and pat it dry.  Then, place it in the bowl with whisked eggs, covering both sides of the chicken.  Then, coat with bread crumb/parmesan mixture and place on the baking sheet.  Do this with all of your chicken pieces.

Ready to go in the oven.


Step 4- Bake at 350 degrees on middle rack of oven for 45-55 minutes until chicken is cooked all the way through.  Turn once halfway through cooking.  Outside coating should be a nice, golden brown on both sides.  Everyone's oven is different, so keep an eye on it towards the end to ensure it doesn't get over/underdone.

Step 5-  About 15 minutes before your chicken is going to be done cooking, heat a large saute' pan over medium heat.  Drizzle with olive oil (about a Tbsp. or so) and add your pre-sliced mushrooms.  Stir for about 3-4 minutes and then add garlic paste.  I added about a Tbsp. of garlic paste to the mushrooms.  Stir until mushrooms are coated.  Next, add gravy packet and 1 cup of wine.  Stirring well.  Bring to a simmer (stirring often) and then lower the heat.  Continue simmering until it's the consistency of a nice, thick gravy.  Then remove from heat but keep warm.

Step 6-  Once your gravy/mushroom mixture is done, your chicken should be about ready.  Once chicken is finished, remove from oven and pour mushroom mixture over top.  Serve nice and hot.


--------------Garlic Broccoli Pasta Side--------------
(This is how I made it and it made a LOT.  You may want to halve the recipe.  I just knew that my kids would be eating leftovers for dinner tonight.)
1 package of Angel Hair Pasta
1 package of frozen broccoli florets in a steamer bag. 
Garlic paste
Olive oil
Salt
Pepper

Step 1- In a large pot of boiling salted water, cook noodles.  Drain.  In the meantime, pop your broccoli florets in the microwave and steam according to the bag instructions.  Chop into fine pieces... careful, it's HOT.

Step 2- Return noodles to pot and drizzle with olive oil.  (Honestly, I didn't measure.  I just drizzled around the pot, stirred and drizzled a little more.  NOT greasy, but lightly coat the noodles.)  Add about 1 1/2 Tbsp. of garlic paste and the steamed broccoli floret pieces and mix well.  A little salt and pepper and you're done.

Side complete.


--------------Candied Pecan Cranberry Salad with Parmesan Flakes--------------
This is extremely easy to swap ingredients and add/subtract whatever you'd like.  I made this for the whole family, but you can modify for a single portion.

1 Spring Mix Salad (I used the large "Dole" Spring Mix that came in a big plastic clamshell.  Still have a lot left over in the original packaging, so looking forward to future lunches.)
Roasted, unsalted sunflower kernels
Candied pecans
Parmesan cheese
Dried cranberries
Balsamic Vinaigrette dressing

Step 1- Wash your salad and put in a large bowl.  Then, sprinkle sunflower kernels, candied pecans, and dried cranberries on top.

Step 2- Using a potato peeler, peel off strips of parmesan cheese from the wedge.  Break the strips into shorter strips and sprinkle over the top.

Step 3- Portion out your servings and top with balsamic vinaigrette dressing. 

Enjoy!

Monday, February 13, 2012

DIY Rainbow Envelopes and Cam's Toad Valentines

      Tomorrow is Valentine's Day and I got a little excited.  Cameron told me that his class wasn't planning on making Valentine holders (remember the shoeboxes or envelopes you used to decorate and everyone slipped a Valentine in at the party?).... in class, so I asked him to ask his teacher if she minded my making some.  I got the go-ahead, but was told that I couldn't just do one for him, that if I did it, it had to be for the entire class.

     I wanted to do something easy, something that I could make with things I already had.  I came up with these:
Or if you wanted to see a photo of the ones for the entire class:


They were one of the easiest projects I've done.  Here's how you do it...

Supplies You'll Need (for a single envelope)
1 1/2 pieces of 12 x 12" cardstock.  One will be left intact, the other should be cut in half smack down the middle
20" ribbon
Sewing machine and thread
Cardstock to make labels (I made mine with my Silhouette Cameo, or you can purchase pre-made labels)
Hole punch
Double-sided tape or sticky dots

Step 1-
Make sure that you have one piece of 12 x 12" cardstock and another piece that has been cut exactly in half.  They can be the same color for a solid-color envelope, or different (as I did for the above envelopes) for a multicolor envelope.
Step 2-
Measure to the halfway point of the shorter piece and punch two holes equal distance from the middle.  Then, use this as a guide for punching the top of your larger piece.  I laid the smaller, punched piece on top, lined up the edges, and then used the holes as a guide to punch the larger piece.
Step 3-
     If you are making multiples (as I did) lay out your cardstock and place your colors at random.  Otherwise, just lay your small piece on top of your large piece with the holes up on both sides.  Unpunched sides lined up along bottom.  (Smaller piece on top of the larger piece... lined up at the bottom.)

Step 4-
     Starting at the right top edge of the small piece, start sewing (backtack at the beginning and end) around the outer 3 edges.
I found that making sure it's lined up before you start sewing is usually enough to keep it in place.  I also had a walking foot on my machine.  (This was not due to planning beforehand, I was merely too lazy to switch feet and the walking foot ended up giving me some additional control.)

Step 5-
    Cut 20" of thin ribbon and run it through the backside of the short piece and up through the big piece.
Then, using the ribbon as a guide, fold the large piece down to meet the short piece... lining up the holes before folding.

Now, you can tie the ribbon in a bow.


Step 6-
     Use double-sided tape to secure labels to the envelopes.  You're done!


     These can be used to keep all kinds of things.  You can store labels, stickers, what-have-you.  I chose to use them as rainbow Valentine holders.  The kids in the class can write their names on the envelopes to tell whose is whose.

     Another project I tackled today was Cam's Toad Valentines.  Not sure if you guys remember the chocolate frogs that I made for Cam's Harry Potter birthday, but I don't like to use things once and let them sit there unused for years at a time.  I had a great time making the chocolate frogs and brainstormed for a way to break out the frog mold again.

     Why not have frog Valentines? 

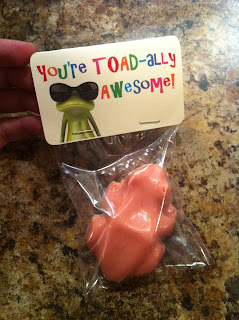
     At first, I thought of "You make my heart jump".   However, Travis thought that it was too "girly".  While having a conversation with my Mom, we decided that "You're Toad-ally Awesome" would be a much more "manly" Valentine.  Frogs, toads, the mold could go either way. 

     Once again, I decided that it was time to use the Silhouette machine.  Nowadays, I wonder when I DON'T use it.  I created the labels from scratch using the Silhouette software.  Drew a rounded rectangle that would fit the bags I purchased for putting the toads in.  Then, I copied and pasted another rectangle to match it, welded the two together, formed the letters (Flipped the "To" and "From" side upside-down), and added some free graphics that were available through an Internet search.  (DO NOT STEAL GRAPHICS.  MAKE SURE YOU HAVE PERMISSION TO USE THEM OR THEY ARE FREE FOR PERSONAL USE.)

The labels were then printed on my printer and then cut on the Silhouette.


     Now it was time for my favorite part... making the chocolate frogs, err... toads.

     I used Wilton's candy melts in white and red.  The girls got pink toads (white mixed with a teeny bit of red), and the boys got white toads.

In the mold, then into the fridge.

Once they had hardened, I popped them out of the mold, let them come down to room temperature, then put them into bags and heat-sealed them so they stayed fresh.  My husband was a huge help with this.  I held the bag straight and counted while he pushed the bar down to seal.  He even snapped the picture for me.  (Thanks, honey!)

     I did one batch at a time, rotating through the steps.  As one was being sealed, more were coming to room temperature, even more were in the fridge, and the whole cycle just continued. 

     First batch of girl toads in their heat-sealed bags:

     The final step in the process was to staple the card toppers to the bags (without disturbing or going below the heat seal). 

     The finished result:


     There were a few more that didn't make it on the plate, but I'm sure you guys are able to get an idea of how they came out.

     Ready for Valentine's Day!

Wednesday, February 1, 2012

Harry Potter Party

All the planning and all the prep for my son's Harry Potter birthday party made it a great success!  It was a lot of work, but I think that the results really paid off in the end.

It did take me a few days to finally put this up on the blog.  Honestly, I was dead tired.  :)

Without further ado, the pics from the party.

The very first taste of the Harry Potter theme greeted guests at the door with the "Hogwarts Express- 9 3/4" platform sign.  Gotta ride the train to make it in!  Once guests came through the door, the rest of the party decorations were in full view.

     I knew that I wanted to have the illusion of candles floating since I had seen it in one of the movie scenes in the dining hall at Hogwarts.  I had done a few Google searches and came across a picture in the Image search that showed "floating candles" but couldn't access the link and didn't have an explanation.  Looking at the tiny picture, I thought that I could come up with a way to have a similar effect.  Not sure if it was the same or not as what I had seen, but this was my take on it.
I took four eyescrews and screwed them into the ceiling (well, my husband did under my direction).  Two were on one side of the kitchen, two on the other.  The ones closest to the lights over the dining room table were closer together than the ones on the end I was standing to take this picture... putting the focus on the table.  After that, clear fishing line was strung two form two lines running across.

    I then took sheets of printer paper, cut them in half width-wise and then rolled each side up into a tube and taped it with clear tape in three spots down the seam.  I then used the Silhouette cutter to do a print and cut (I know, I know, I do this all the time) to make the candle flames. 

    For the flames, I drew a semi-rounded long triangle.  Then, I selected the triangle, flipped it vertically and had the tips of the flames touching.  Right clicked the mouse and selected "weld" to have it all be one piece.  Next, I drew another smaller long, rounded triangle in the base and made the fill color dark orange.  Removed the "cut" line from the smaller triangle (didn't want to cut that), copied it, flipped it vertically and put it on the top.   Finally to finish the whole thing off, select your entire double sided flame and use the replicate tool to make multiples.  Print it with registration marks and send to Silhouette to be cut.

Once cut, the flames look like this...

Put a glue dot on the base of one side of the flame and secure to the paper tube candle.  Another glue dot will go in the center where the thin points meet, which will rest on the fishing line and keep the candle from sliding.  Finally, secure the other side of the flame with another glue dot on the base of the other side... gluing it inside the candle tube.

   Repeat again... and again, and again.  You'll eventually have a row of floating candles (or two rows if you did it like me).

   Hedwig was in position over the dining room table on his chandelier perch. 

Photo taken before candle strings were added.


  And the table was set.  We originally had a skull on there, but it scared Scarlett so bad that she wouldn't go into the kitchen and took it from "Harry Potter" to uber-creepy seance.  I put it away.
   The chocolate frogs were made using Wilton milk chocolate candy melts and a candy mold found on Amazon.  The Gillyweed jar was a glass jar purchased at Hobby Lobby with some oregano from my garden stuffed in.  The liquid luck had been filled up and chilled the night before and the Harry Potter books had maps, general information on Hogwarts, spells, etc.

   My living room had a few decorations put up as well.  The "Wanted" posters (see previous post) were put up both in the living room and the kitchen, a Hogwarts banner and Gryffindor banner were hung from the ceiling,  the Nimbus 2000's were in the corner (ready for the "Find the Snitch" game later), and black balloons were thrown on the floor for fun.  The first Harry Potter was on t.v. for extra "Potter-ness".

Then there was the potion station with refreshment goblets.
    Before any of the guests arrived, my husband and I decided to do a test run of the fog machine for the "Find the Snitch" game.  I had never used one before and wanted to give it a go before the party started and we looked like stupid goobers.

Eureka!  It works!

   When all of the guests arrived and had a chance to settle in and munch on some snacks, it was time to pick teams for "Find the Snitch".   Two teams were put into the sorting hat and each child had to reach in and pick a team.
  We then booted up the fog machine and I explained the rules while the fog was forming.  The rules to the game being:

1.)  You must stay on your Nimbus 2000.
2.)  Watch out for the little kids.
3.)  The team who finds the most Snitches is the winner.

The Snitches they had to find?  (You guys will probably recognize these from my previous post.)
So everyone downed some "Liquid Luck" to help improve their chances of Snitch success. 


And the hunt began!  (This was the only picture I could use because the first game was too fogged out.)
After "Find the Snitch", we had the raffle for the Weasley & Weasley "Beetle Eyes".  Everyone (guests only) had to put their Hogwarts train ticket in the sorting hat and my birthday boy picked a name at random.  The Beetle Eyes were "Sixlets" candies.  Unfortunately, beetles are scarce in the winter.  :)


After the raffle, it was time for "Magic School".  The party guests lined up with their wands and brooms and were taught a few spells and tricks out of the Harry Potter book I made.


Then there was cake:

"Yay!" for Walmart cake!  I was too busy to add another project to the mix so I let this one slide.

You can still see some residual fog in the picture above.  Also, my younger son was sobbing almost the entire party because it wasn't his birthday.  (You can see how much it bothered me, I couldn't help but laugh my butt off at those crocodile tears.)

   Presents followed the cake and then it was time for everyone to go home.  Party guests got to take their wands, Nimbus 2000's, Harry Potter book, and Snitch. 

    Cameron was super happy with his party and it was a lot of fun to do.